When a home experiences damage to its ceiling, it can quickly escalate into a serious project. Whether the damage comes in the form of cracks, water spots, or sagging, it’s important to identify and address these issues before they become more problematic.
Unlike walls, ceilings are more complicated to work with and require more experience when it comes to repair. Read on for tips and tricks to help you get your Ceilings Perth job done right.
Drywall Cracks
Most homeowners experience ceiling cracks at some point, but they don’t have to be a sign of more serious structural issues. Instead, they can be a simple cosmetic problem that can be easily repaired with some joint compound or spackle. When a crack appears in your ceiling, you’ll want to take the time to thoroughly clean up the area and prepare it for repair.
To begin, clear the space around your ceiling to provide unobstructed access and allow you to move furniture or decorative items out of the way. This will help protect your belongings from paint and drywall dust, and it’ll also make cleanup much easier. Next, lay down a piece of plastic or a tarp in the area where you’ll be working to catch loose debris and paint drops. Finally, set up a ladder that can hold your weight, such as an A-frame ladder.
Drywall cracks most often appear where two pieces of drywall meet at an outside wall corner, or in the top-center or bottom-center of the ceiling. They can be caused by house settling, changes in humidity or temperature, or poor workmanship. Most cracks will be a few inches wide, but some may even be quite long.
Fortunately, most of these cracks are relatively easy to fix with mesh or paper tape and mud. The purpose of this method is to prevent future cracks by transferring the stress to the tape, rather than the drywall.
If you have a ceiling crack that isn’t near a corner, apply a strip of mesh tape to the entire surface and then cover it with a layer of joint compound. Then, using a trowel with light pressure, skim the compound with a skip texture to fill in the crack. If you do this right, the cracked area will not be visible once it dries. Once it dries, you can sand the patched area to smooth it and then paint over it. A good quality drywall primer and paint will also help to disguise the repair. You can find these products at most home improvement stores and online.
Holes
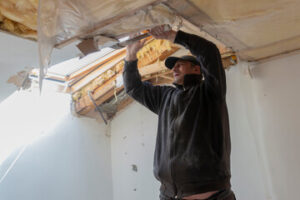
Ceiling holes are a common problem that can occur from many things, including leaks, lighting or fixture damage, or simply age and wear. Regardless of the cause, repairing these gaps is important because they can leave interior areas of your home exposed to other types of damage such as wood rot. In addition, the gap will allow water to seep in through the ceiling and can cause mold and mildew.
When a wet patch appears on the ceiling, it is important to determine the origin of the moisture as it isn’t always immediately apparent. The location of the spot and other factors such as the season will help you narrow down the source of the leak. Once the cause of the wet patch is determined, you can address it and prevent future issues.
While it may be tempting to attempt DIY ceiling repair, this type of work is not for the faint of heart. It requires a significant amount of physical labor and the use of specialized tools for each task. Plus, if you don’t have the right skills or know-how, you could end up making the issue worse. If you do decide to take on the challenge, there are a few tips and tricks that can help you complete the project more successfully.
First, make sure to prep the area by clearing it of any debris and ensuring there is enough room to work. You should also wear protective gear, such as a mask and safety goggles, for your safety. Safety goggles that fully wrap around your eyes are preferable to those with open sides as they will provide more coverage from dust and other materials that may fall on you as you work.
Once the area is cleaned, a primer should be applied to the surface of the ceiling to prepare it for a new coat of paint. Then, it is a good idea to sand the surface to smooth any bumps or uneven areas. Finally, a finish coat should be applied. This will protect the repaired surface and add a fresh, appealing look to your ceiling.
Water Damage
If you spot water damage on your ceiling, it’s important to act immediately. The longer a ceiling absorbs moisture, the more likely it is to affect its structural integrity, threaten your safety, or foster microbial growth. If you’re able to determine the source of the water damage—it may be a roof leak, a faulty plumbing fixture, or condensation—it’s possible that you can fix the problem yourself.
However, if you’re seeing a pattern of water spots or smell a musty odor in your home, there is likely a serious issue with the ceiling structure itself. In this case, it’s best to bring in a professional to prevent further damage to the ceiling and potential health problems for your family.
Depending on the severity of the water damage and how long it went unnoticed, fixing your ceiling may involve anything from a simple touch-up with Spackle and paint to replacing or repainting the entire area. It’s also important to dry the affected area thoroughly before beginning any repair work. Drywall holds water surprisingly well, so it may take days or even weeks for your ceiling to be fully dry. To speed up the process, consider renting high-powered fans and using dehumidifiers to help get the job done faster.
In some cases, the water damage on your ceiling may have caused mold to form. If you notice any signs of mold in your home—including a musty odor or yellow, green, or brown spots on the ceiling—it’s imperative to act as soon as possible. Mold can cause a wide range of health issues, including rashes, dizziness, headaches, and asthma attacks.
To address the mold, use a dehumidifier to remove any moisture, then clean the surface with a damp cloth and mild dishwashing detergent. Next, apply a coat of joint compound to the affected area, then add a layer of drywall tape, followed by another coat of joint compound and a final coating of joint tape. Once the area is completely dry, you can begin painting once again. A primer with a stain blocker will help prevent future water stains or mold from appearing on your ceiling.
Structural Issues
Ceilings are often overlooked, but they’re important parts of any room that should be kept in good condition. Regular cleaning, repainting, and ensuring that pipes are well-ventilated can help keep ceilings strong and problem-free. However, if you do notice cracks, stains, or other issues, it’s best to call a professional repairman right away. A professional can handle a range of ceiling issues, including water damage, leaks, and sagging.
The cost of ceiling repairs will vary based on the type of issue and materials needed to fix it. For example, a small crack that doesn’t affect the structure of a home or building might be easy to repair with a DIY kit that costs between $10 and $30. But larger cracks, sagging, or any discoloration could indicate a more serious problem that needs to be addressed immediately.
Leaks are one of the most common problems that homeowners run into with their ceilings. Depending on the severity, a leak can cause major structural damage that requires significant replacement or repair work. If you suspect that you leak your ceiling, you should shut off your water supply and contact a repair specialist as soon as possible.
If your ceiling is sagging, it’s likely due to moisture and water damage. It may be a sign that the drywall tape has failed, or it might be caused by a roof leak or other water damage in your home. To resolve the issue, you’ll need to dry the area, remove any stains, and repaint the ceiling. Before you repaint, it’s a good idea to apply a stain-blocking primer.
It’s usually best to leave complex and expensive ceiling repairs to professionals, especially if they involve structural materials like beams or plumbing. They have the knowledge, tools, and experience to make repairs quickly and effectively without compromising quality. Professionals also understand the nuances of different ceiling types, textures, and finishes, which is critical for an undetectable restoration. They can spot any underlying issues and address them promptly to prevent further problems and save you money in the long run.